Julia
Julia is a high-level, high performance dynamic programming language for numerical computing. It provides a sophisticated compiler, distributed parallel execution, numerical accuracy, and an extensive mathematical function library. Julia’s Base library, largely written in Julia itself, also integrates mature, best-of-breed open source C and Fortran libraries for linear algebra, random number generation, signal processing, and string processing.
Documentation
Usage on Bridges-2
To see what versions of Julia are available and if there is more than one, which is the default, along with some help, type
module spider julia
To use Julia, include a command like this in your batch script or interactive session to load the Julia module: (note ‘module load’ is case-sensitive):
module load julia
Using Julia through a Jupyter Notebook
You can use Julia via a Jupyter notebook. You must first install your own copy of Julia on Bridges-2 and add IJulia to your environment. These steps only need to be done once. Then you can start a Jupyter notebook to run Julia in at any time.
Install Julia and IJulia
Install your own copy of Julia on Bridges-2 by typing
curl -fsSL https://install.julialang.org | sh
This will edit your shell configuration file (.cshrc, .bashrc, etc.), so you should log out and log back in to Bridges-2 so that you have your updated settings.
While logged into Bridges-2, install IJulia with the following commands:
module load anaconda3
julia
Once Julia starts, at the julia> prompt, type
using Pkg
Pkg.add("IJulia")
exit()
Now you can use Julia in a Jupyter Notebook at any time.
Use Julia through a Jupyter noteboook
To use Julia through a Jupyter notebook, you will need to:
- Start a Jupyter Notebook in an interactive session on Bridges-2
- Make a second SSH connection to Bridges-2
- Open a browser tab to that SSH connection
1. Start a Jupyter Notebook in an interactive session on Bridges-2
While logged in to Bridges-2, start an interactive session by typing:
interact -n 4
See more about interactive sessions on Bridges-2 in the Bridges-2 User Guide.
Start a Jupyter Notebook in your interactive session by typing:
module load anaconda3
jupyter notebook --no-browser --ip=0.0.0.0
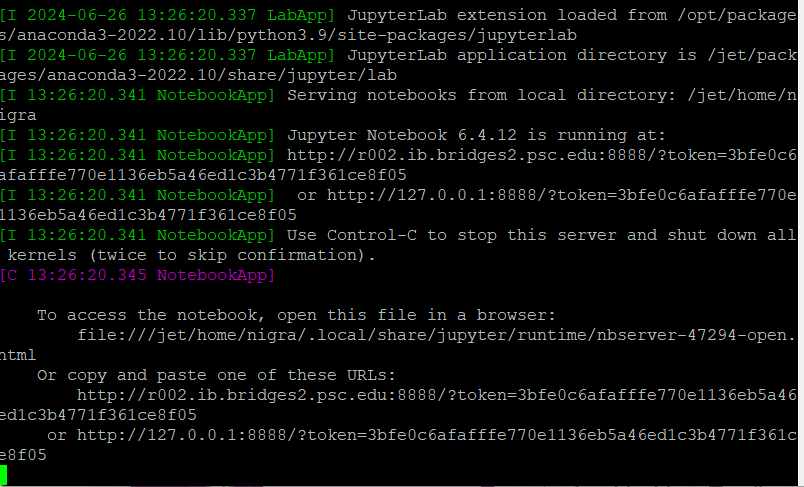
Output from this command will look something like this:
2. Make a second SSH connection to Bridges-2
You will need a second SSH connection to Bridges-2 to display your Notebook.
First, identify the node, port and IP address that you are using.
From the output of the jupyter notebook command in the previous step, you will find the node name, port and IP address that you are using. Find the line that reads “Jupyter notebook number is running at…” The lines following that show the connection to Bridges-2 in two different ways. The first uses the node name, and the second uses the IP address of that node. You will need both.
Respectively, the format of those lines is
http://node-name:port/?token=some-long-string and
http://ip-address:port/?token=some-long-string
In the example above, the node name is r002.ib.bridges2.psc.edu, the IP address is 127.0.0.1, and the port is 8888.
Open another SSH connection. You can do this from a Unix shell, the terminal program on a Mac, or the command shell on a Windows machine. This connection should be from port 8888 on your local machine to the node and port identified above by typing
ssh -L 8888:node-name:port username@bridges2.psc.edu
In this example, the command would be:
ssh -L 8888:r002.ib.bridges2.psc.edu:8888 username@bridges2.psc.edu
You will be prompted for your PSC password and logged in to Bridges-2.
3. Open a browser tab to connect to the second SSH session
Open a browser on your desktop. Copy the line with the IP address from the output of the jupyter notebook command above, and be sure to include the entire token. Paste that line into your browser. In this example, you would copy and paste this entire line:
http://127.0.0.1:8888/?token=3bfe0c6afafffe770e1136eb5a46ed1c3b4771f361ce8f05
Your Jupyter Notebook will open in that browser and you can use Julia.


